

A headset microphone can look professional but still sound unclear during calls.
The real issue may be hidden in its frequency response curve.
Headset microphone frequency response is tested by placing the microphone in a controlled acoustic room, fixing it in a test fixture, playing standard sound signals through a speaker, and recording how the microphone reacts at different frequencies.
The final curve shows pickup balance, voice clarity, and weak or strong frequency areas.
A simple call recording can tell us how a microphone sounds.
But a frequency response test tells us why it sounds that way.
What Is Headset Microphone Frequency Response?
A headset microphone does not pick up every sound in the same way.
Some frequencies may be stronger, while others may be weaker.
Microphone frequency response means how a microphone reacts to different sound frequencies.
For a headset microphone, this curve helps engineers judge whether speech is picked up clearly, whether the voice sounds thin or dull, and whether the microphone is suitable for real communication.
Why Frequency Response Matters
Frequency response is like a hearing chart for a microphone.
Human speech is not one simple sound.
It is made of many frequency parts.
Low frequencies add weight and warmth.
Middle frequencies carry the main body of the human voice.
High frequencies add clarity, detail, and consonants.
If the low-frequency area is too strong, the voice may sound heavy or muddy.
If the middle-frequency area is weak, the voice may sound far away.
If the high-frequency area is too weak, the listener may feel the speech is not clear enough.
If the high-frequency area is too strong, the voice may sound sharp or tiring.
For a headset used in calls, the goal is not to capture every sound like a studio microphone.
The goal is to capture speech clearly and naturally.
That is why engineers care about the shape of the curve.
A smooth and suitable curve can make speech easier to understand.
A poor curve can make the same microphone sound unclear, even if the chip and software are good.
| Frequency Area | Simple Meaning | Call Quality Impact |
|---|---|---|
| Low frequency | Voice weight and warmth | Too much can sound muddy |
| Middle frequency | Main speech body | Affects natural voice |
| High frequency | Clarity and detail | Affects consonants |
| Sharp peak | Strong boost at one point | May sound harsh |
| Deep dip | Weak response at one point | May lose speech detail |
It Is Not Only About the Microphone Part
A single microphone component may have a good datasheet.
But once it is installed inside a headset boom, the result can change.
The acoustic hole, dust mesh, boom cavity, internal space, and microphone angle can all change the final response.
This is why engineers must test the microphone inside its real structure.
The user does not use a bare microphone.
The user uses a complete headset.
So the test must reflect the complete product as much as possible.
Why Is an Anechoic Chamber Used for Microphone Testing?
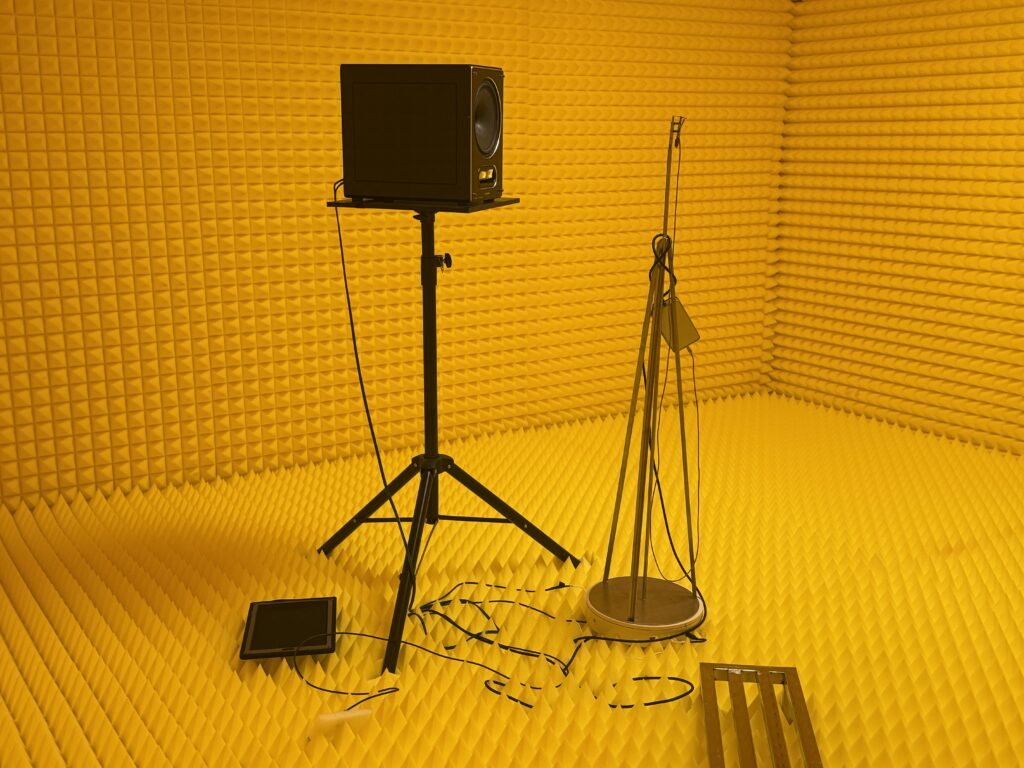
A normal room adds echoes, reflections, and background noise.
These sounds can make the microphone curve look wrong.
An anechoic chamber is used because it reduces sound reflection and outside noise.
This helps engineers measure the microphone’s own response more clearly, instead of measuring the room, the walls, the desk, or other unwanted acoustic effects.
The Problem With Normal Rooms
Sound does not travel in only one straight line in a normal room.
It comes out of the speaker.
Then it hits walls, tables, screens, floors, and other equipment.
After that, part of the sound reflects back into the microphone.
The microphone then receives both the direct sound and the reflected sound.
This creates a problem.
The software may record a curve that is affected by the room, not only by the microphone.
Some frequencies may look stronger because the room reflects them.
Some frequencies may look weaker because direct and reflected sounds cancel each other.
This can lead engineers in the wrong direction.
They may think the microphone has a problem, but the problem may come from the test space.
What the Chamber Helps Control
An anechoic chamber uses sound-absorbing material on the walls, floor, or ceiling.
This material reduces sound reflection.
It also helps create a more stable acoustic field.
When the test environment is stable, the curve becomes more reliable.
This is very important when engineers compare different samples.
If sample A and sample B are tested in a noisy or reflective room, the comparison may not be fair.
If both are tested in a controlled chamber, the difference is more likely to come from the product itself.
| Test Place | Main Risk | Data Reliability |
| Office room | Echo and noise | Low |
| Meeting room | Wall and table reflection | Medium to low |
| Factory area | Machine noise | Low |
| Simple quiet room | Some reflection remains | Medium |
| Anechoic chamber | Controlled sound field | Higher |
Repeatability Is the Real Value
The best test is not only accurate.
It must also be repeatable.
If the same microphone gives a different result every time, the data is not useful.
Engineers need stable data to make decisions.
They may need to change the boom design, acoustic hole size, microphone direction, or software setting.
If the test environment keeps changing, they cannot know whether the change comes from the product or from the room.
This is why an anechoic chamber is not just a professional-looking place.
It is a tool for reducing risk.
It makes the result cleaner.
It makes comparison easier.
It helps engineers avoid late-stage mistakes.
What Equipment Is Needed for the Test?
Microphone testing is not only about putting a headset into a room.
The setup must hold the microphone in the right position and record the signal correctly.
A headset microphone frequency response test usually needs a controlled acoustic room, a calibrated speaker, a test fixture, a microphone boom structure, a power or signal connection, audio test software, and a computer.
Each part helps keep position, sound source, and data stable.
Basic Test Setup
A common test starts with a microphone installed into a 3D boom or product-like structure.
The microphone cable is kept outside for power or signal connection.
Then the microphone is connected to the test fixture.
The fixture holds the microphone at a fixed angle and position.
The speaker plays the test signal.
The software records how the microphone responds.
This sounds simple, but small setup errors can change the result.
If the microphone angle changes, the curve may change.
If the speaker distance changes, the sound pressure level may change.
If the cable moves or touches the structure, noise may enter the signal.
If the fixture is loose, the result may not be stable.
Common Equipment List
- Controlled acoustic room: reduces outside noise and reflection.
- Test speaker: plays the sound source.
- Microphone boom structure: holds the microphone like the real product.
- Test fixture: fixes position and connects the signal.
- Power or signal cable: keeps the microphone working during the test.
- Audio test software: records and displays frequency response data.
- Computer: stores, compares, and manages the test result.
- Angle control tool: keeps the pickup direction consistent.
Why the Fixture Is Important
The fixture is one of the most important parts of the test.
It makes the test repeatable.
For headset development, engineers often need to compare many design versions.
They may compare one microphone position with another.
They may compare one acoustic hole with another.
They may compare a bare microphone with a microphone installed inside the boom.
They may compare samples from different production batches.
Without a stable fixture, these comparisons may not be useful.
The curve may change only because the microphone was placed a little differently.
This is why a professional test does not rely on hand placement.
It needs a fixed test method.
The Product Structure Must Be Included
A headset microphone is affected by more than the microphone itself.
The boom shape matters.
The acoustic hole matters.
The protection mesh matters.
The inner cavity matters.
The final product may change the sound before it reaches the microphone.
So engineers should not test only the microphone component and assume the complete headset will perform the same.
The complete structure should be tested as early as possible.
This helps find problems before mass production.
How Is the Microphone Positioned During the Test?
Microphone position is not random.
It should copy the real call position as closely as possible.
The microphone is fixed inside a boom or test fixture, with its pickup opening facing the planned sound direction.
Engineers control the angle, distance, and cable position to avoid blocking the acoustic path or changing the microphone’s real pickup behavior.
Position Affects the Result
For headset microphones, a few millimeters can matter.
A microphone placed closer to the mouth may pick up a stronger voice.
But it may also pick up breathing noise, popping sounds, or mouth noise.
A microphone placed farther away may sound cleaner in some ways.
But it may also lose voice strength.
The angle is also important.
If the pickup hole does not face the correct direction, the voice may become weaker.
If the boom blocks the acoustic path, high-frequency clarity may drop.
If the internal cavity creates resonance, the voice may become sharp or unnatural.
Main Position Factors
| Position Factor | What It Can Change |
| Microphone opening direction | Voice pickup level |
| Boom length | Distance from the mouth |
| Acoustic hole size | Clarity and sound loss |
| Dust mesh | Protection and high-frequency loss |
| Internal cavity | Peaks and resonance |
| Cable placement | Noise and stability |
| Fixture angle | Curve repeatability |
Real Use Should Guide Testing
A headset microphone should be tested in a way that matches its final use.
If the headset is designed for customer service, the microphone should be tested in a speech-focused position.
If it is designed for business calls, the boom should reflect the final wearing angle.
If it is designed for outdoor communication, more tests may be needed for wind and noise.
The frequency response test itself is only one part.
But it gives engineers a controlled starting point.
After that, they can add real call recordings, background noise tests, and user wearing tests.
This order is important.
First, the microphone must pick up speech correctly in a controlled space.
Then engineers can judge how it performs in complex environments.
If the controlled test already shows a weak or unstable voice band, real-world performance will usually be harder to fix.
How Does the Test Software Record the Frequency Curve?
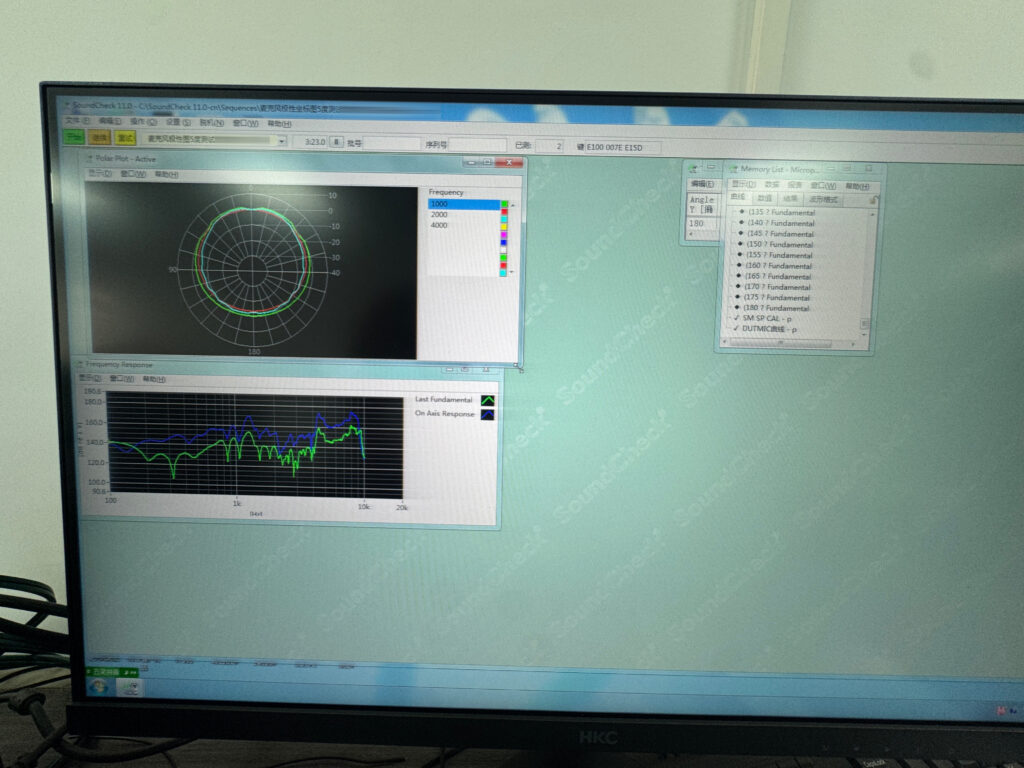
The test software does more than show a sound level.
It turns microphone response into frequency data.
The software records the microphone output while the speaker plays controlled sound signals.
It then measures the output level at different frequencies and displays a frequency response curve, usually with frequency on the horizontal axis and response level in dB on the vertical axis.
What Happens During the Test
After the microphone is fixed, the chamber door is closed.
The speaker starts to play the test signal.
The signal may sweep through different frequencies.
The microphone picks up the sound and converts it into an electrical signal.
The test fixture sends this signal to the software.
The software records the response at each frequency.
Then it creates a curve.
This curve allows engineers to see which frequencies are strong and which are weak.
It also helps them compare the tested microphone with a target curve or another sample.
How to Read the Chart
The horizontal axis shows frequency.
The left side usually represents lower frequencies.
The middle area represents the main speech area.
The right side represents higher frequencies.
The vertical axis shows response level.
A higher curve means the microphone picks up that area more strongly.
A lower curve means the microphone picks up that area more weakly.
| Curve Area | Meaning |
| Left side | Low frequencies |
| Middle area | Main speech frequencies |
| Right side | High frequencies |
| Higher line | Stronger pickup |
| Lower line | Weaker pickup |
| Sharp peak | Possible resonance |
| Deep dip | Possible sound loss |
Data Still Needs Human Judgment
A curve is powerful, but it is not the full answer.
A headset microphone also needs low noise, low distortion, stable sensitivity, good wind handling, and good call performance.
Software noise reduction also matters.
Bluetooth transmission may also affect final sound quality.
So engineers should not look at the curve alone.
They should combine curve data with listening tests.
They should record calls in quiet rooms.
They should record calls in noisy places.
They should check if speech remains clear when the wearer moves.
They should test more than one sample.
Only then can they understand the real call experience.
The frequency response curve shows where the problem may be.
Real call tests show whether users will notice the problem.
What Does the Frequency Response Curve Reveal About Call Quality?
A headset can have noise reduction and still sound unclear.
The microphone must first capture speech correctly.
Frequency response testing can reveal whether the microphone captures key speech bands clearly before software processing.
It can show weak voice areas, harsh peaks, blocked acoustic paths, unstable pickup, and structure-related sound loss that may affect real call quality.
Clear Calls Start Before Noise Reduction
Many people judge call quality by asking one question.
Does the headset have noise reduction?
This question is useful, but it is not enough.
Noise reduction can reduce unwanted background sound.
But it cannot fully repair a poor microphone pickup design.
If the voice is weak before processing, the software has less useful signal to work with.
If the high-frequency detail is lost before processing, the listener may still feel the voice is unclear.
If the microphone structure creates a harsh peak, the voice may sound sharp even after processing.
This is why basic microphone response matters.
Good call quality starts with good pickup.
Common Problems Found by Frequency Response Testing
| Test Finding | Possible Call Effect |
| Weak middle frequencies | Voice sounds far away |
| Weak high frequencies | Speech lacks clarity |
| Too much low frequency | Voice sounds muddy |
| Sharp high-frequency peak | Voice sounds harsh |
| Deep response dip | Some speech details disappear |
| Big sample difference | Batch consistency risk |
| Big angle difference | Wearing position affects calls |
Why This Helps Product Development
Frequency response testing helps engineers find problems early.
If the middle band is weak, they may adjust the microphone opening or boom position.
If the high-frequency area drops too much, they may check the dust mesh, acoustic hole, or internal path.
If there is a sharp peak, they may check cavity resonance or software gain.
If different samples show different curves, they may check material consistency or assembly process.
This makes the test useful for both design and production.
It is not only a lab report.
It is a guide for product improvement.
For buyers and product managers, this test also reduces risk.
A sample may sound fine in a short office call.
But it may fail in a real call center, warehouse, outdoor site, or meeting room.
Frequency response testing gives a more objective view before larger investment.
Why Should This Test Be Done Before Mass Production?
A sample that can make calls is not always ready for production.
Mass production needs stable and repeatable performance.
Before mass production, microphone frequency response testing helps confirm whether the headset design is stable, repeatable, and suitable for real communication.
It reduces the risk of unclear voice, inconsistent batches, late structure changes, and customer complaints after shipment.
Sample Approval Is Not Enough
Many headset projects move too fast from sample approval to production.
This can be risky.
A few samples may sound acceptable.
But mass production adds many new variables.
The microphone batch may change.
The assembly worker may place the mesh slightly differently.
The acoustic hole may have a small tolerance difference.
The boom cavity may not be sealed in the same way every time.
The cable may be routed a little differently.
Each small difference can affect the final microphone response.
This is why testing should not stop at one sample.
Engineers should test several samples.
They should compare the curves.
They should check whether the product stays within an acceptable range.
What to Check Before Production
- Whether the key speech frequency area is stable.
- Whether left and right samples behave consistently if both sides are involved.
- Whether different units show similar curves.
- Whether microphone angle changes create large response changes.
- Whether the acoustic hole and mesh are assembled consistently.
- Whether software gain and noise reduction match the hardware design.
- Whether the test result matches real call recordings.
The Cost of Late Problems
Late microphone problems are expensive.
If the product is already in production, changing the structure may require new tooling, new parts, or new assembly steps.
If the product is already shipped, the problem may become a customer complaint.
For a business headset, unclear voice can hurt the user experience quickly.
People use these products for calls, meetings, customer service, training, and remote work.
If the other person cannot hear clearly, the product fails its main job.
This is why frequency response testing is not just an engineering detail.
It is part of quality control.
It protects the product.
It protects the buyer.
It protects the brand experience.
FAQ
How do you measure microphone frequency response?
Microphone frequency response is measured by playing controlled sound signals and recording the microphone output at different frequencies.
The result is shown as a curve in dB across the test frequency range.
Do you need an anechoic chamber to test a microphone?
An anechoic chamber is not always required, but it gives cleaner and more repeatable results.
Normal rooms can add reflections that affect the curve.
What is a good frequency response for a microphone?
A good response depends on the use case.
For headset calls, clear speech bands and stable pickup are more important than a perfectly flat curve.
Why does microphone position affect frequency response?
Position changes the sound path into the microphone.
Distance, angle, boom shape, and acoustic holes can all change voice pickup and high-frequency clarity.
What does dB mean in a microphone frequency response chart?
dB shows the response level at each frequency.
A higher dB value means stronger pickup, while a lower value means weaker pickup.
What is the difference between frequency response and sensitivity?
Frequency response shows how the microphone reacts across different frequencies.
Sensitivity shows the overall output level for a given sound pressure.
Can software fix a poor microphone frequency response?
Software can improve some issues, but it cannot fully fix a poor acoustic design.
Clear pickup should start from microphone placement and structure.
Why test several microphone samples before production?
Several samples show whether the design is stable and repeatable.
This helps find batch differences, assembly issues, and production risks before shipment.
Conclusion
Microphone frequency response testing turns call clarity from a feeling into data.
It helps engineers build clearer, more stable, and more reliable headset microphones.